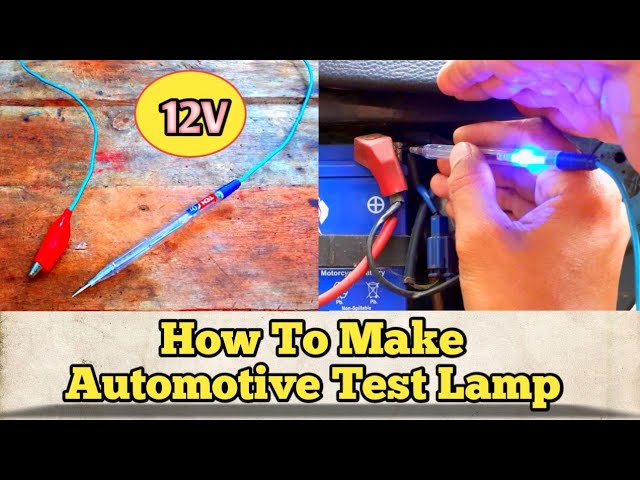
To make an automotive test light, connect a bulb to a probe and ground wire. Test the setup on a known power source.
An automotive test light is a handy tool for diagnosing electrical issues in vehicles. It helps identify power and ground circuits, ensuring proper electrical flow. To create one, you’ll need a bulb, a probe, and a ground wire. This simple device can save you time and money by quickly pinpointing electrical faults.
It’s essential for both professional mechanics and DIY enthusiasts. Understanding how to make and use an automotive test light can improve your vehicle maintenance skills. This guide will provide step-by-step instructions to help you build your own test light efficiently.
Materials Needed
Creating an automotive test light is simple and cost-effective. You’ll need specific tools and components. This guide will outline all the materials required. Let’s get started with the essentials.
Essential Tools
- Soldering Iron: Useful for joining wires securely.
- Wire Strippers: Essential for removing insulation from wires.
- Multimeter: Helps in testing electrical circuits.
- Screwdriver Set: Needed for assembling and disassembling components.
Required Components
- 12V Bulb: The core component that lights up.
- Insulated Wires: For connecting the bulb to power.
- Alligator Clips: To attach the test light to the power source.
- Plastic Housing: To encase the bulb and wires securely.
Here’s a quick table summarizing the materials:
| Tools | Components |
|---|---|
| Soldering Iron | 12V Bulb |
| Wire Strippers | Insulated Wires |
| Multimeter | Alligator Clips |
| Screwdriver Set | Plastic Housing |
Having these materials ready will make the process smooth and efficient. Now, you’re all set to assemble your automotive test light!

Safety Precautions
Before starting to make your automotive test light, safety is crucial. Handling electrical components can be dangerous. Wear proper protective gear to avoid accidents.
Handling Electrical Components
Always make sure the car engine is off. Disconnect the battery to avoid electric shock. Use insulated tools to prevent short circuits.
- Check all wires and connections before touching them.
- Do not work near water or damp areas.
- Keep your working area clean and dry.
Inspect your tools for any damage. Replace damaged tools immediately. Never use faulty equipment.
Protective Gear
Wearing the right protective gear is essential. Always wear insulated gloves and safety glasses. These can protect you from electric shocks and debris.
| Gear | Purpose |
|---|---|
| Insulated Gloves | Protects hands from electric shocks |
| Safety Glasses | Shields eyes from debris |
| Non-conductive Shoes | Prevents electric grounding through feet |
Ensure your protective gear is in good condition. Faulty gear can lead to serious injuries. Always double-check before starting your work.
Step-by-step Instructions
Creating your own automotive test light is a rewarding project. Follow these steps to build a reliable tool for diagnosing electrical issues in your vehicle. This guide ensures you have a clear understanding of each phase, from preparation to assembly.
Preparing The Workspace
Before starting, ensure your workspace is clean and organized. Gather all necessary tools and materials:
- Wire stripper
- Soldering iron and solder
- Electrical tape
- Two alligator clips
- 12V light bulb
- Light bulb holder
- Approximately 2 feet of wire
Having everything ready will make the process smoother. Clear any unnecessary items from your workspace to avoid distractions.
Assembling The Test Light
Follow these steps to assemble your test light:
- Strip the wires: Use the wire stripper to strip about 1/2 inch of insulation from both ends of the wire.
- Attach the light bulb holder: Connect the stripped ends of the wire to the terminals of the light bulb holder. Secure the connection with solder.
- Install the light bulb: Screw the 12V light bulb into the holder.
- Connect the alligator clips: Attach one alligator clip to each end of the wire. Solder them in place for a secure connection.
- Insulate the connections: Wrap electrical tape around any exposed wire or solder joints to prevent short circuits.
Once completed, test the light by connecting it to a 12V power source. The bulb should illuminate if assembled correctly.
Now you have a functional automotive test light ready for use.
Wiring The Test Light
Creating an automotive test light is a rewarding DIY project. It helps you diagnose electrical issues in your car. This guide will cover the crucial step: Wiring the Test Light. Let’s dive into connecting and securing the wires.
Connecting Wires
First, gather your materials. You need a light bulb, wire, and connectors. Cut the wire to your desired length. Strip the ends of the wire using a wire stripper. Ensure you have a clean, exposed wire.
Next, connect one end of the wire to the light bulb. Twist the exposed wire around the bulb’s terminal. Use pliers for a firm twist. Now, attach a connector to the other end of the wire. This connector will clip to the car’s power source.
Securing Connections
Securing connections ensures your test light works reliably. Use electrical tape to wrap around the twisted wire and bulb terminal. This prevents any accidental disconnections.
For added security, you can use heat shrink tubing. Slide the tubing over the connection, then apply heat with a heat gun. The tubing will shrink and secure the connection tightly.
Lastly, check all your connections. Tug gently on the wires to ensure they are secure. A secure connection means a reliable test light.
| Step | Description |
|---|---|
| 1 | Gather materials: light bulb, wire, connectors |
| 2 | Cut wire and strip ends |
| 3 | Connect wire to bulb and twist |
| 4 | Attach connector to other end of wire |
| 5 | Secure connections with tape or tubing |
| 6 | Check all connections for tightness |
Follow these steps to wire your test light correctly. A properly wired test light will help you solve electrical problems in your car efficiently.
Testing Your Device
Now that you’ve built your automotive test light, it’s time to ensure it works. Testing your device is crucial to confirm its functionality and reliability. Follow the steps below to perform a thorough check.
Initial Power Check
First, connect the test light to a known power source. Use your car battery for this step. Attach the alligator clip to the negative terminal. Touch the probe to the positive terminal. The test light should illuminate. If it lights up, your device works.
If the light does not turn on, check the bulb and connections. Ensure all wires are securely attached. A loose connection can prevent proper function.
Troubleshooting Issues
If your test light fails the initial check, follow these troubleshooting steps:
- Check the bulb: Remove and inspect it. Replace if necessary.
- Inspect the wires: Look for breaks or frayed ends. Repair or replace damaged wires.
- Examine the connections: Ensure all joints are tight and secure.
- Test the power source: Verify the battery’s charge. A dead battery won’t light the test light.
For a detailed check, use a multimeter. Measure continuity across the device. It should show a complete circuit if all components are intact.
If you still encounter problems, double-check your assembly steps. Sometimes, a small error can cause issues. Make sure every part is in the right place.

Tips And Tricks
Creating an automotive test light is a valuable skill. Here are some tips and tricks to make your test light more durable and functional. Follow these insights to enhance your tool’s performance.
Improving Durability
Durability is key for a reliable automotive test light. Focus on using high-quality materials to ensure longevity. Use a sturdy handle made from rubber or plastic. This provides a comfortable grip and withstands wear and tear.
- Choose a robust wire that can handle rough conditions.
- Use heat-shrink tubing to protect wire connections.
- Ensure the bulb is securely fastened to prevent damage.
Enhancing Functionality
For a functional test light, consider adding features that improve usability. A few enhancements can make a big difference.
- Use a bright LED bulb for better visibility.
- Add a clip or magnet to the handle for easy attachment.
- Incorporate a fuse to protect the circuit from damage.
Below is a table summarizing key materials and enhancements for your test light:
| Component | Recommended Material | Additional Tips |
|---|---|---|
| Handle | Rubber/Plastic | Ensure a comfortable grip |
| Wire | Heavy-duty | Use heat-shrink tubing |
| Bulb | Bright LED | Secure fastening |
| Additional Features | Clip/Magnet, Fuse | Enhance usability and protection |
Common Mistakes
Creating an automotive test light is a simple task. Yet, many make common mistakes. These errors can lead to faulty tools or even damage. This section highlights common errors and how to avoid them.
Avoiding Short Circuits
One common mistake is creating short circuits. Short circuits can damage your car and test light. Always ensure the connections are correct. Use a multimeter to check for continuity. Make sure no wires touch each other accidentally.
Here are some tips to avoid short circuits:
- Double-check all connections.
- Use insulated wires.
- Keep positive and negative wires separate.
Correct Soldering Techniques
Soldering incorrectly is another frequent error. Poor soldering can lead to weak connections. Weak connections can cause the test light to fail. Use proper soldering techniques to ensure strong connections.
Follow these steps for correct soldering:
- Heat the soldering iron.
- Clean the tip of the iron.
- Heat the wire and component together.
- Apply solder to the heated wire and component.
- Allow the solder to cool before moving the wire.
Important tips for soldering:
- Use a good quality soldering iron.
- Work in a well-ventilated area.
- Avoid breathing fumes directly.

Frequently Asked Questions
What Is An Automotive Test Light?
An automotive test light is a simple diagnostic tool. It checks for voltage in electrical circuits. It helps identify issues in car wiring.
How To Use An Automotive Test Light?
To use, connect the test light clip to the ground. Then touch the probe to the circuit. If it lights up, there’s voltage.
Can You Make An Automotive Test Light At Home?
Yes, you can make one with basic materials. You’ll need a light bulb, wire, and alligator clips. Follow simple DIY steps.
What Materials Are Needed For A Test Light?
You need a light bulb, wire, and alligator clips. These are common and inexpensive. They can be found in hardware stores.
Conclusion
Creating your own automotive test light is simple and cost-effective. Follow the steps carefully for best results. With a homemade test light, you can diagnose electrical issues easily. Always prioritize safety and double-check connections. Now, you are ready to tackle automotive electrical problems confidently.
Happy troubleshooting!


